Whether you're building a blog, image gallery, dashboard, file host, etc.. chances are you'll be needing a way to upload files via your web application. In this tutorial we'll be looking at how to build a file uploader that uses AJAX. It will consist of a simple HTML + JavaScript front end to allow the user to select multiple files at once and a NodeJS backend to handle the file upload sent via the HTML form.
The AJAX requests allow us to upload multiple files and display their progress without having to reload the page or navigate away from it.
We will be using a NodeJS module called formidable which is a fast, easy to use, and well-tested form data parser. It is also capable of handling multiple file uploads in the same request which is perfect for our purposes.
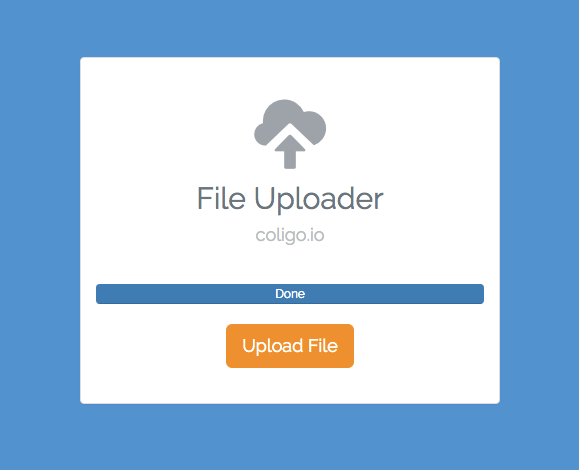
If you haven't had a chance to check out the demo yet, here's what the front end of our file uploader is going to look like:
Setting Up the Project
Let's get started by setting up the NodeJS project and installing the necessary modules we'll be using in our application.
The folder structure for our project will look like this:
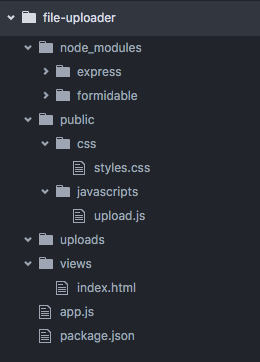
- node_modules/ contains our NodeJS module dependencies
- public/ contains the javascript and css for our front end
- uploads/ will be where we upload the files
- views/ contains the HTML templates we will serve up to visitors
- app.js will have the routes and main logic for our back end
- package.json has general information about our project and it's dependencies
Go ahead and create the root directory for our project, in this case I named it file-uploader. We can now cd into that directory and run npm init and follow the prompts to create the package.json file.
Now that we have the package.json created, let's install our dependencies:
- express: to handle the routes and serve up the HTML, CSS, and JS files
- formidable: to parse the incoming form data containing the file uploads
The command to install the dependencies via NPM:
npm install express formidable --save
You should now see the node_modules directory with express and formidable in your project folder.
Note: if you're using NPM version 3 or later, you might not see a separate directory for each dependency. NPM version 3 got rid of nested dependencies, meaning express and formidable will be installed in the root of the node_modules folder along with all the modules they depend on.
The Front End
The HTML and CSS for our front end are relatively simple. It uses Twitter Bootstrap for some basic aesthetics and responsiveness.
Create a file in the views/ directory and call it index.html. This contains the basic page structure and most importantly our HTML file input.
<!DOCTYPE html>
<html>
<head>
  <meta charset="utf-8">
  <meta http-equiv="X-UA-Compatible" content="IE=edge">
  <meta name="viewport" content="width=device-width, initial-scale=1">
  <title>File Uploader - coligo.io</title>
  <link href='//fonts.googleapis.com/css?family=Raleway' rel='stylesheet' type='text/css'>
  <link rel="stylesheet" href="https://maxcdn.bootstrapcdn.com/bootstrap/3.3.6/css/bootstrap.min.css">
  <link href="css/styles.css" rel="stylesheet">
</head>
<body>
  <div class="container">
    <div class="row">
      <div class="col-xs-12">
        <div class="panel panel-default">
          <div class="panel-body">
            <span class="glyphicon glyphicon-cloud-upload"></span>
            <h2>File Uploader</h2>
            <h4>coligo.io</h4>
            <div class="progress">
              <div class="progress-bar" role="progressbar"></div>
            </div>
            <button class="btn btn-lg upload-btn" type="button">Upload File</button>
          </div>
        </div>
      </div>
    </div>
  </div>
  <input id="upload-input" type="file" name="uploads[]" multiple="multiple"></br>
  <script src="https://code.jquery.com/jquery-2.2.0.min.js"></script>
  <script src="https://maxcdn.bootstrapcdn.com/bootstrap/3.3.6/js/bootstrap.min.js"></script>
  <script src="javascripts/upload.js"></script>
</body>
</html>
We won't go into details about each line of HTML in here since it's mostly just basic HTML and Bootstrap classes. Instead, let's focus specifically on the HTML file input:
<input id="upload-input" type="file" name="uploads[]" multiple="multiple">
type="file" will give us a file-select field and a browse button to select the file we wish to upload, which doesn't look too fancy but does the job:

The multiple attribute allows the user to select multiple files from the file picker dialog at once. You can change it to allow only one file at a time by removing that attribute.
As you can see from the demo, that plain looking file input does not show up, instead we are using the orange upload button to make it look more appealing. We will hide this file input element by adding this property to the CSS:
#upload-input {
  display: none;
}
And we will later add the logic to the JavaScript such that each time the user clicks on the orange upload button, it triggers the hidden file input box to bring up the file picker dialog.
Create the CSS file under public/css/ and call it styles.css:
.btn:focus, .upload-btn:focus{
  outline: 0 !important;
}
html,
body {
  height: 100%;
  background-color: #4791D2;
}
body {
  text-align: center;
  font-family: 'Raleway', sans-serif;
}
.row {
  margin-top: 80px;
}
.upload-btn {
  color: #ffffff;
  background-color: #F89406;
  border: none;
}
.upload-btn:hover,
.upload-btn:focus,
.upload-btn:active,
.upload-btn.active {
  color: #ffffff;
  background-color: #FA8900;
  border: none;
}
h4 {
  padding-bottom: 30px;
  color: #B8BDC1;
}
.glyphicon {
  font-size: 5em;
  color: #9CA3A9;
}
h2 {
  margin-top: 15px;
  color: #68757E;
}
.panel {
  padding-top: 20px;
  padding-bottom: 20px;
}
#upload-input {
  display: none;
}
@media (min-width: 768px) {
  .main-container {
    width: 100%;
  }
}
@media (min-width: 992px) {
  .container {
    width: 450px;
  }
}
You should now have a basic, styled HTML page with an upload button and a progress bar. Let's jump into the JavaScript an add some logic to our front end such as handling the clicks on the upload button and making AJAX requests to the server.
Create a file call upload.js under the public/javascripts/ directory to house this logic.
First things first, let's get the upload button working so that each time the user clicks on the big orange upload button, it automatically triggers that hidden file input. jQuery makes this quite straight forward by assigning a click listener to the upload button and triggering a click event on the file input.
$('.upload-btn').on('click', function (){
    $('#upload-input').click();
});
We also want to reset the progress bar to 0% each time a user attempts to select a new set of files for upload:
$('.upload-btn').on('click', function (){
    $('#upload-input').click();
    $('.progress-bar').text('0%');
    $('.progress-bar').width('0%');
});
Now for the actual file uploading logic! We want to listen to the file input for a change event. This will tell us that the user clicked the upload button and selected a file or hit cancel. As soon as a change event is triggered, we want to verify that one or more files were actually selected to ensure that the user didn't hit cancel.
$('#upload-input').on('change', function(){
  var files = $(this).get(0).files;
  if (files.length > 0){
    // One or more files selected, process the file upload
  }
});
files is an array containing all the files selected by the user
We now need to create and populate a FormData object which is basically a set of key/value pairs representing form fields and their values. Once constructed, we can send this FormData object with our AJAX request to the server.
$('#upload-input').on('change', function(){
  var files = $(this).get(0).files;
  if (files.length > 0){
    // One or more files selected, process the file upload
    // create a FormData object which will be sent as the data payload in the
    // AJAX request
    var formData = new FormData();
    // loop through all the selected files
    for (var i = 0; i < files.length; i++) {
      var file = files[i];
      // add the files to formData object for the data payload
      formData.append('uploads[]', file, file.name);
    }
  }
});
After we've verified that the user has selected one or more files and added them to the FormData object, we can create the AJAX request that will POST the data to our /upload endpoint:
$.ajax({
  url: '/upload',
  type: 'POST',
  data: formData,
  processData: false,
  contentType: false,
  success: function(data){
      console.log('upload successful!');
  }
});
- The data we are sending is the formData object we constructed
- Setting
contentTypeto false tells jQuery not to add aContent-Typeheader for us - Setting
processDatato false stops jQuery from attempting to convert theformDataobject to a string
We've successfully created the font end logic that will handle selecting multiple files and POSTing the data to the server via an AJAX request. The last thing we need to do for the front end is add the logic to update the progress bar which is done via the xhr option in the jQuery AJAX call:
xhr: function() {
  // create an XMLHttpRequest
  var xhr = new XMLHttpRequest();
  // listen to the 'progress' event
  xhr.upload.addEventListener('progress', function(evt) {
    if (evt.lengthComputable) {
      // calculate the percentage of upload completed
      var percentComplete = evt.loaded / evt.total;
      percentComplete = parseInt(percentComplete * 100);
      // update the Bootstrap progress bar with the new percentage
      $('.progress-bar').text(percentComplete + '%');
      $('.progress-bar').width(percentComplete + '%');
      // once the upload reaches 100%, set the progress bar text to done
      if (percentComplete === 100) {
        $('.progress-bar').html('Done');
      }
    }
  }, false);
  return xhr;
}
Our complete upload.js file now looks like so:
$('.upload-btn').on('click', function (){
    $('#upload-input').click();
    $('.progress-bar').text('0%');
    $('.progress-bar').width('0%');
});
$('#upload-input').on('change', function(){
  var files = $(this).get(0).files;
  if (files.length > 0){
    // create a FormData object which will be sent as the data payload in the
    // AJAX request
    var formData = new FormData();
    // loop through all the selected files and add them to the formData object
    for (var i = 0; i < files.length; i++) {
      var file = files[i];
      // add the files to formData object for the data payload
      formData.append('uploads[]', file, file.name);
    }
    $.ajax({
      url: '/upload',
      type: 'POST',
      data: formData,
      processData: false,
      contentType: false,
      success: function(data){
          console.log('upload successful!\n' + data);
      },
      xhr: function() {
        // create an XMLHttpRequest
        var xhr = new XMLHttpRequest();
        // listen to the 'progress' event
        xhr.upload.addEventListener('progress', function(evt) {
          if (evt.lengthComputable) {
            // calculate the percentage of upload completed
            var percentComplete = evt.loaded / evt.total;
            percentComplete = parseInt(percentComplete * 100);
            // update the Bootstrap progress bar with the new percentage
            $('.progress-bar').text(percentComplete + '%');
            $('.progress-bar').width(percentComplete + '%');
            // once the upload reaches 100%, set the progress bar text to done
            if (percentComplete === 100) {
              $('.progress-bar').html('Done');
            }
          }
        }, false);
        return xhr;
      }
    });
  }
});
The Back End: Processing the Upload
We've successfully setup a front end through which the user can select multiple files to upload and monitor their progress through a simple progress bar. In this section we will be focusing on the NodeJS backend to process incoming requests to our upload route.
We will add all the backend logic and upload handling to the app.js file in the root of our project folder.
Let's start off by requiring all the modules needed for the file uploader:
var express = require('express');
var app = express();
var path = require('path');
var formidable = require('formidable');
var fs = require('fs');
expresshandles our routing and serves up the index.html page and static files to our visitorsformidablewill parse the incoming form data (the uploaded files)- The
fsmodule will be used to rename uploaded files
We'll use the express.static middleware to serve up the static files in our public/ directory and we'll create a route which will serve up the homepage (index.html) when someone visits the website:
app.use(express.static(path.join(__dirname, 'public')));
app.get('/', function(req, res){
  res.sendFile(path.join(__dirname, 'views/index.html'));
});
Create the upload/ route to handle the incoming uploads via the POST method:
app.post('/upload', function(req, res){
  // create an incoming form object
  var form = new formidable.IncomingForm();
  // specify that we want to allow the user to upload multiple files in a single request
  form.multiples = true;
  // store all uploads in the /uploads directory
  form.uploadDir = path.join(__dirname, '/uploads');
  // every time a file has been uploaded successfully,
  // rename it to it's orignal name
  form.on('file', function(field, file) {
    fs.rename(file.path, path.join(form.uploadDir, file.name));
  });
  // log any errors that occur
  form.on('error', function(err) {
    console.log('An error has occured: \n' + err);
  });
  // once all the files have been uploaded, send a response to the client
  form.on('end', function() {
    res.end('success');
  });
  // parse the incoming request containing the form data
  form.parse(req);
});
Now that we have everything set up and the route to handle the uploads in place, all we need to do it start our NodeJS server and start processing uploads!
var server = app.listen(3000, function(){
  console.log('Server listening on port 3000');
});
Our full app.js file now looks like so:
var express = require('express');
var app = express();
var path = require('path');
var formidable = require('formidable');
var fs = require('fs');
app.use(express.static(path.join(__dirname, 'public')));
app.get('/', function(req, res){
  res.sendFile(path.join(__dirname, 'views/index.html'));
});
app.post('/upload', function(req, res){
  // create an incoming form object
  var form = new formidable.IncomingForm();
  // specify that we want to allow the user to upload multiple files in a single request
  form.multiples = true;
  // store all uploads in the /uploads directory
  form.uploadDir = path.join(__dirname, '/uploads');
  // every time a file has been uploaded successfully,
  // rename it to it's orignal name
  form.on('file', function(field, file) {
    fs.rename(file.path, path.join(form.uploadDir, file.name));
  });
  // log any errors that occur
  form.on('error', function(err) {
    console.log('An error has occured: \n' + err);
  });
  // once all the files have been uploaded, send a response to the client
  form.on('end', function() {
    res.end('success');
  });
  // parse the incoming request containing the form data
  form.parse(req);
});
var server = app.listen(3000, function(){
  console.log('Server listening on port 3000');
});
You can now start the server by typing node app.js in your console and navigate to http://localhost:3000 in your browser to test out the file uploader for yourself!
Conclusion
We covered how to create an AJAX file uploader using NodeJs as our backend and a simple HTML + JavaScript front end. Remember that you can always swap out the NodeJs for any other backend like PHP, Python, Ruby, etc... and still keep the same front end logic.
Also, be sure to checkout the full working code for this tutorial on GitHub if you'd like to integrate it into your own website or application using the concepts we learned.